


Building cabinet doors can be simple and affordable. Even if you’ve seen complicated methods online, you can create great-looking, sturdy doors with just basic DIY tools. This guide covers three ways to make cabinet doors, from easy to more advanced. You’ll also learn how to get professional results without spending a lot.
Why Stop Overbuilding Cabinet Doors?
Many people think cabinet doors have to be complicated, with fancy joinery and expensive materials. (How To Build Your Own Simple Shaker Style Cabinet Doors, 2025) In reality, most DIY cabinet doors are much simpler, and making them too complex can waste time and money. (6 Best Low-Cost DIY Doors for Small Projects That Pros Keep Secret, 2023) Choosing simple methods helps you save money and pick up useful skills for future projects. Here are three ways to make cabinet doors, from beginner to advanced, that work well every time.
Method 1: Beginner Cabinet Door (MDF Shaker Style)
Tools You’ll Need:
- Circular saw
- Sander
- Clamps
- Square
- DIY grit and determination!
This is the perfect method for those just getting into woodworking, and it’s the least complicated approach. The key is using MDF (Medium Density Fiberboard), a budget-friendly material that’s smooth and easy to work with. (Cheap Cabinet Doors DIY: Budget-Friendly Solutions for Small Spaces, n.d.)
Step-by-Step Process:
- Choose Your Materials: Head to your local Home Center and grab half-inch and quarter-inch MDF sheets. You’ll be using the half-inch sheet for the base of the door and the quarter-inch sheet as your faux rails and stiles.
- Measure and Cut:
- Start by measuring the width and height of your cabinet opening, and add an inch to each dimension for the overlay. This ensures your door will have a half-inch overlay all around.
- Use your circular saw to cut the MDF. To keep the cuts straight, use a quarter-inch MDF piece as a guide rail.
- Remember, always measure twice to ensure accuracy.
- Glue and Assemble: Once all the pieces are cut, assemble them with glue, then clamp them together. You can also use brad nails for extra support, but glue alone will work fine.
- Finish and Install: Once the glue is dry, sand the edges to smooth out any rough spots. Then, paint or finish the door as desired, and you’re good to go!
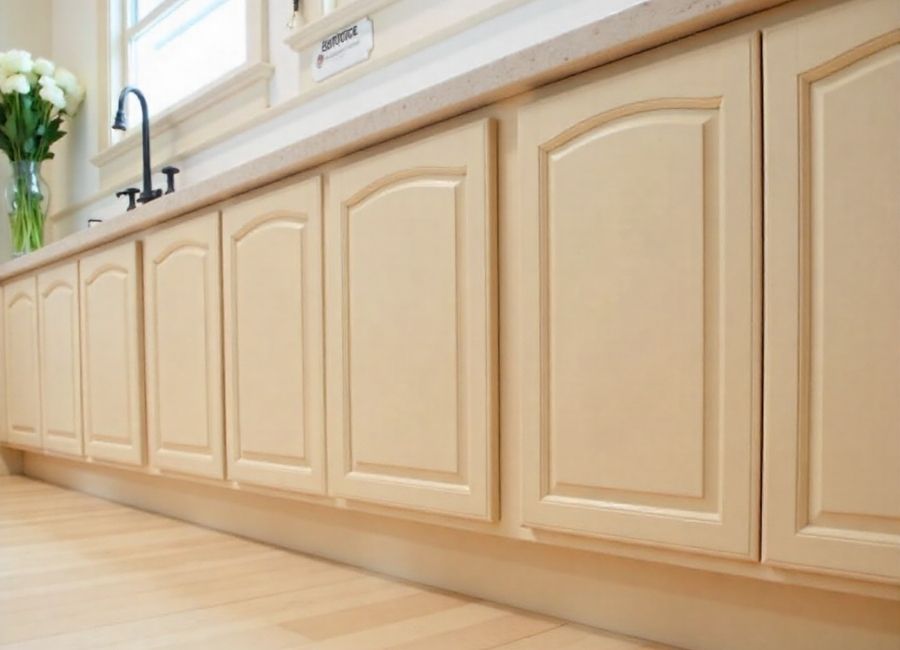
This method is easy, efficient, and highly effective for a clean, modern look that fits seamlessly into most kitchen or bathroom designs. (M & Tylynn, n.d.)
Method 2: Intermediate Cabinet Door (MDF and Wood Rails/Stiles)

Tools You’ll Need:
- Circular or mitre saw
- Router with rabbeting bit
- Sander
- Square
- Drill for pocket holes (optional)
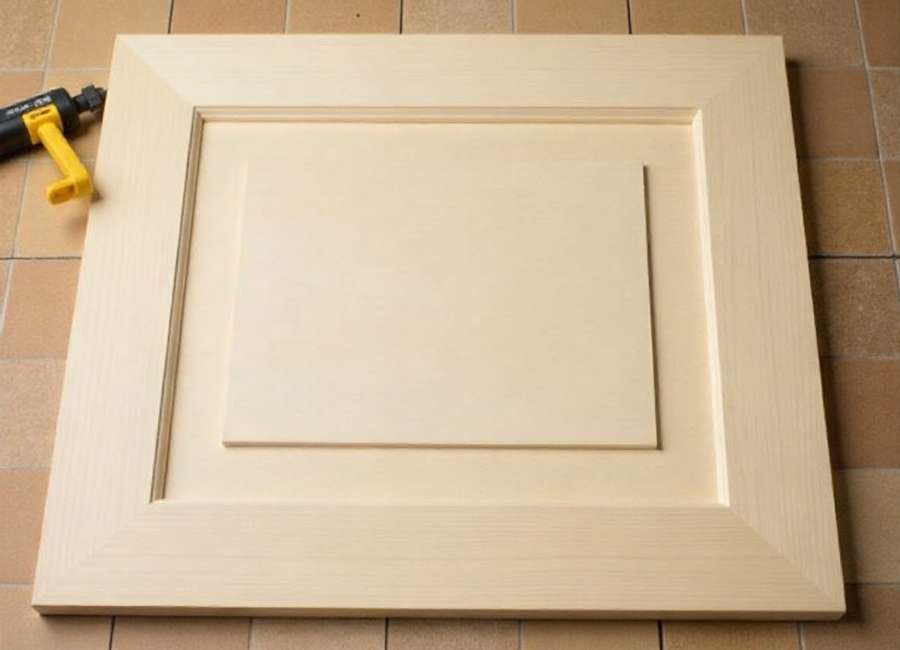
For those ready to take their woodworking to the next level, this intermediate method uses a mix of MDF and wood rails/stiles, providing extra durability and a more polished look. (Monroe Slim Shaker Cabinet Door, n.d.)
Step-by-Step Process:
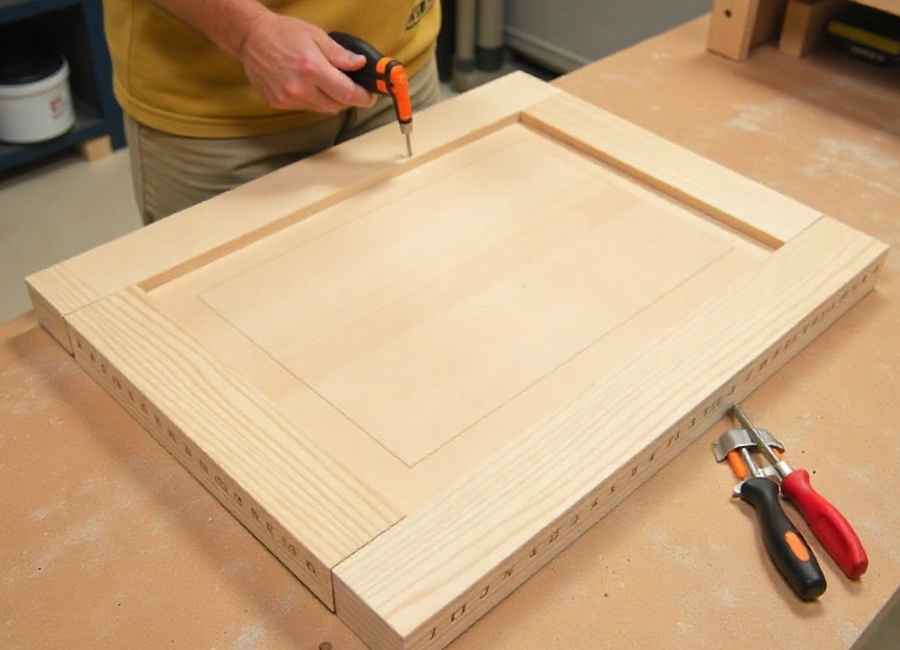
- Cut the Rails and Stiles: Cut your wood pieces to the desired length for the vertical (stiles) and horizontal (rails) components of your door. Use a square to make sure your cuts are perfectly at 90 degrees.
- Create the Groove: Using a router with a rabbeting bit, create a groove along the edges of the rails and stiles to hold the center panel in place. This will give the door a more professional, finished look.
- Assemble the Door:
- Attach the rails to the stiles using glue and screws (pocket holes are optional). This provides a solid joint and ensures the door stays secure.
- Add your center panel, which can be either MDF or plywood. The panel should fit snugly into the groove.
- Final Touches: Fill any gaps or joints with wood filler, then sand the door smooth. Once you’re happy with the results, paint or finish the door.
This method is a great choice for projects that require a bit more finesse and will give you a solid, durable door that can handle everyday use. (Master Cabinet Joinery Techniques: Expert Tips for 2025, 2025)
Method 3: Advanced Cabinet Door (Hardwood Rails/Stiles)
Tools You’ll Need:
- Table saw
- Sander
- Clamps
- Wood filler
- Wood glue
If you’re ready for a bigger challenge, this advanced method uses hardwood rails and stiles for a strong and attractive door. You’ll need more tools, but the finished product will look great.
Step-by-Step Process:
- Cutting the Rails and Stiles:
- Using a table saw, cut your hardwood to size. Poplar is a great, affordable choice for paint-grade projects, but you can also opt for maple if you want a more durable option. (Poplar Wood Cabinets: Advantages And Disadvantages, n.d.)
- Set the blade height to half an inch to create grooves for the center panel.
- Making the Tenon and Groove Joint:
- To connect the rails and stiles, you’ll need to create a tenon and groove joint using a table saw. This joint will give your door a sturdy, professional-grade construction.
- Use a combination square to measure the depth of the groove, and adjust the fence for a perfect fit.
- Panel Selection: Choose between MDF for a paint-grade door or plywood for a stain-grade door. The panel should fit comfortably in the groove with a slight gap for expansion and contraction.
- Assembly: Once the pieces are cut and the grooves are in place, assemble the door using wood glue and clamps. If you want to reinforce the joints further, you can also use screws or nails.
- Finishing Touches: Sand all edges, fill in any gaps, and apply your preferred finish. A high-quality primer followed by paint will give your door a sleek, durable finish.
This method is great if you want to make custom, high-quality cabinet doors. It takes more time and tools, but the results are worth the effort. (How to Build DIY Cabinet Doors, n.d.)
Conclusion: Choosing the Right Method for Your Project
No matter your experience, you can make great cabinet doors with just a few tools and some effort. These three methods work for different skill levels, tools, and budgets. The main point is that you don’t need to overbuild; simple methods can still give you a professional look without costing much.
If you’re starting, go with the beginner method using MDF. For more durability and a slightly elevated look, try the intermediate MDF and wood rails method. And if you’re looking for a truly professional-grade cabinet door, the advanced hardwood rails and stiles approach is the way to go.
Woodworking is about finding what works best for you. As you practice, you’ll get more confident and ready for bigger projects, but there’s no need to make things complicated at first. Please keep it simple, and most of all, have fun building!


