


Hi, I’m Evlyn from alhomi.com. I’m happy to share how we handled our plumbing rough-in. We passed inspection with only a few small issues, which I’ll explain how I fixed. For my first full-home plumbing job, I’m proud of the results.
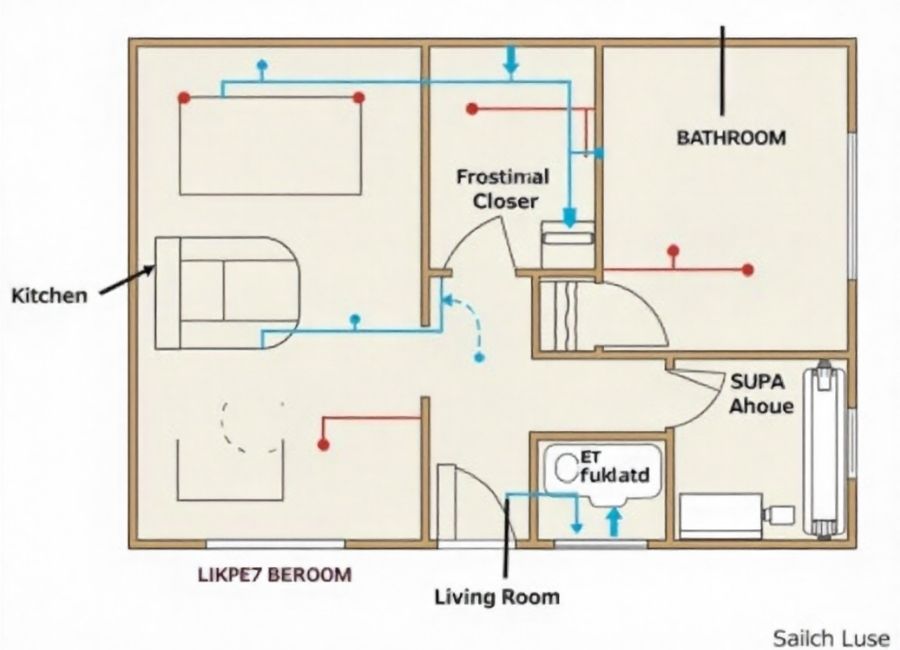
First, here’s the layout. I’m in the kitchen, with the front door to my left. When you walk in, there’s a big storage closet and a spot for a bench. You can see the bathroom from here, which leads to the main bedroom. The living room is on the other side.
Kitchen Plumbing Setup
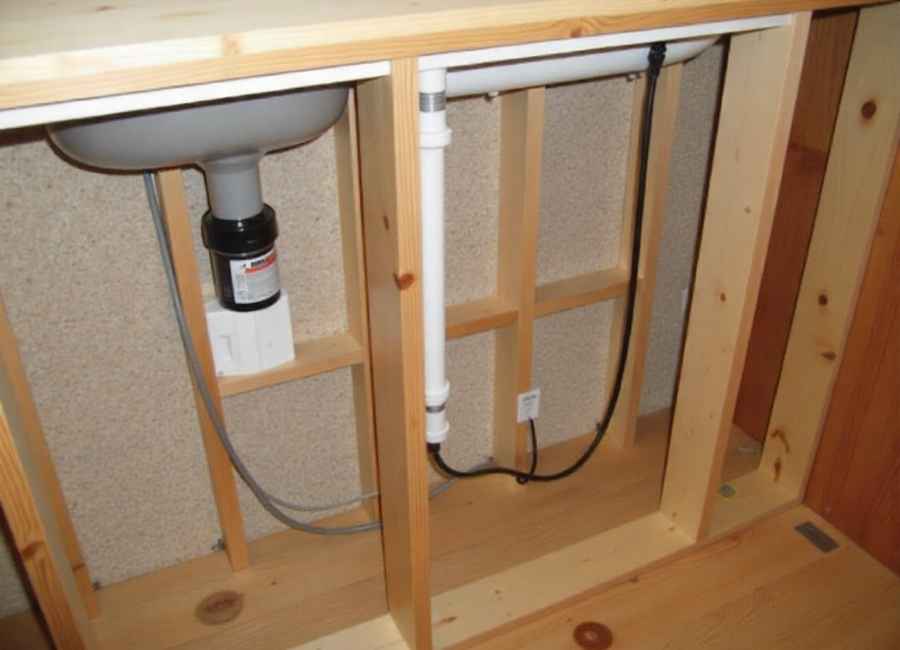
The sink will be just to the side of the window, and the dishwasher will be on its left. The sink uses a 1.5-inch drain that runs through the wall studs to a stack vent. Water drains down, and the vent brings in air from above to help it flow.
We’re using a 1.5-inch ABS pipe (you might use PVC in your area) that dumps into a 2-inch drain with a 2-inch vent. The vent runs up through two plates – I’ve spray-foamed the holes to prevent airflow – then elbows off and continues across the attic.
Attic Vent System
In the attic, the 2-inch line from the kitchen is hung at the right angle so condensation drains back down. I strapped it every four feet with simple nail straps. The line runs across, connects to another vent I added (I’ll explain that soon), and then joins the main stack.
Here’s our main 3-inch stack running from the roof down through the main floor to the basement. One correction I had to make was insulating the top portion. The inspector wanted to see it upsized to 4 inches before going through the roof to prevent frost buildup, but insulating the pipe was an acceptable alternative. (Protection of Pipes and Plumbing System Components, 2025)
Bathroom Plumbing Details
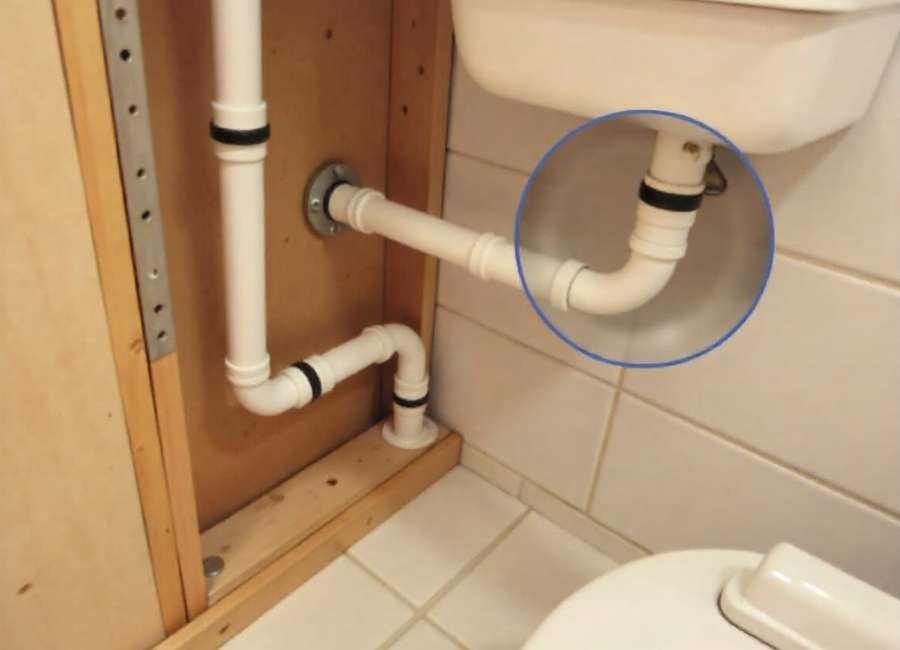
Moving into the bathroom, the 3-inch main stack comes down from the attic and through the floor. The vanity sink uses a 1.5-inch drain going through the wall into a 2-inch drain/vent system that connects to the main stack.
You’ll notice an additional line coming off that 2-inch vent – this vents the downstairs bathroom sink. It connects above the flood level of the upstairs sink, which is required by code. (2024 Plumbing Code of New York State, 2024) This secondary vent is 1.5 inches and prevents having to use just one drain for both sinks, which wouldn’t pass inspection in most areas. (Plumbing Code Essentials: Common Vent, n.d.)
Here’s an important detail: notice how this vent fitting is oriented differently from a standard drain fitting. The curved edge faces up because it’s moving air, not water. For drainage, you’d flip this fitting to have the curved edge facing down, where water would flow. (Sanitary Tee Installation: Upright vs. Upside Down – Does It Matter?, n.d.)
The toilet stub-out is in place, but I’ll wait to attach the flange until the flooring is done. The tub drain connects to the opening below.
Required Corrections
One deficiency I had to address was adding a vent for what the inspector considered a vertical stack. Even though the system was already vented through the main pipe, the code required a dedicated vent at the top of any vertical stack. (2024 Plumbing Code of New York State, 2024) Fortunately, the bathtub location allowed me to run the vent up through the floor, angle it into the wall corner, and tie it back into the main vent system in the attic.
Basement Plumbing System
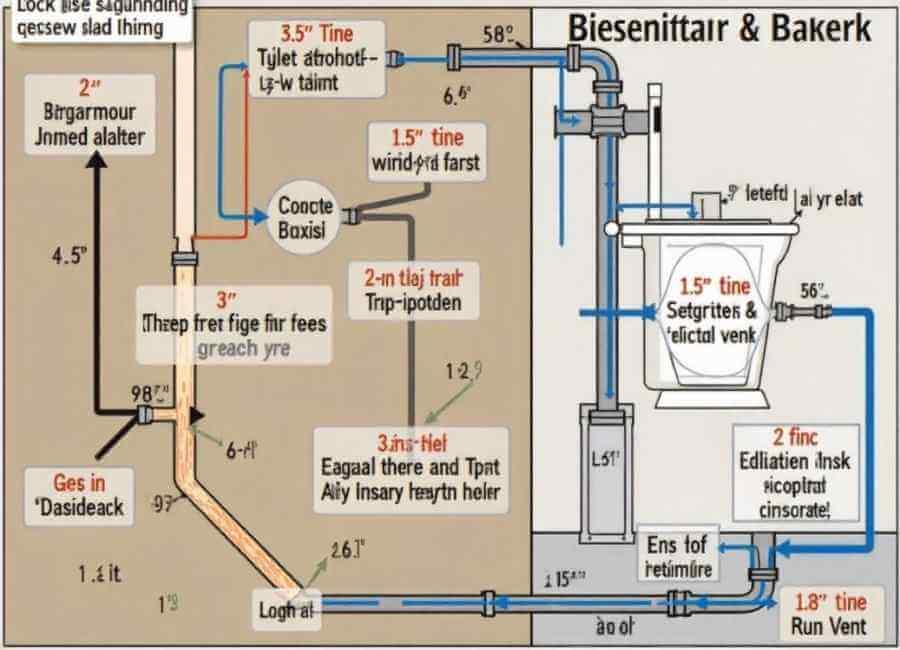
Downstairs, you can see how all the pipes connect. The main 3-inch stack goes down to the floor, and the main floor toilet drain ties in here. I hired a contractor for the rough-in under the slab. There’s a separate video about that part.
The 2-inch drain from upstairs drops straight down, with a small shift to match the concrete. The 1.5-inch vent for the basement sink also runs down here, giving the air flow needed for good drainage.
In the utility room, I added another vent as my second fix. The vertical drain needed its own vent going straight up, which then angles over to join the system I mentioned earlier.
Water Supply System
For the water lines, I’m using PEX-A with expansion rings – I prefer PEX-A over PEX-B for its reliability. (5/8″ PEX F1960 Expansion Ring, 2025) The system starts in the utility room, where a pump will feed from a tank to supply both cold water and the water heater.
I’m using 3/4-inch main lines that branch into 1/2-inch lines for each fixture. I ran separate cold lines for the main floor and basement so they can be shut off individually if needed. The lines are color-coded: blue for cold, red for hot, and white is also available.
The PEX runs through drilled holes in the floor joists (following manufacturer specifications). (Can You Run PEX through Floor Joists? (Explained), 2025) Each fixture gets its dedicated supply lines – kitchen sink hot and cold, toilet supply, shower lines, etc.
To keep things looking neat, I use copper stub-outs through the walls instead of leaving PEX exposed. It looks cleaner and more professional. These fittings come pre-made with PEX-A connections and are ready to install.
Testing and Final Steps
Everything is currently looped together for Right now, everything is looped together for pressure testing. I’ll make a separate video to show how to pressure test with air. The rough-in inspection is done and passed, so only the final inspection is left after installation.


