


When the summer heat hits, a good fan can be a lifesaver. While you can always buy one from the store, there’s a special satisfaction that comes from making something with your own hands. Creating your own fan is a fun, practical project that can be as simple or as complex as you want it to be.
This guide offers three different ways to make a fan, catering to all skill levels. We’ll start with a classic paper fan that anyone can make in minutes. Then, we’ll move on to a simple battery-powered fan for a more consistent breeze. Finally, for those who enjoy a more technical challenge, we will walk through building a USB-powered fan. You’ll learn some basic principles of electronics and create a handy gadget for your desk.
Project 1: The Simple Paper Fan
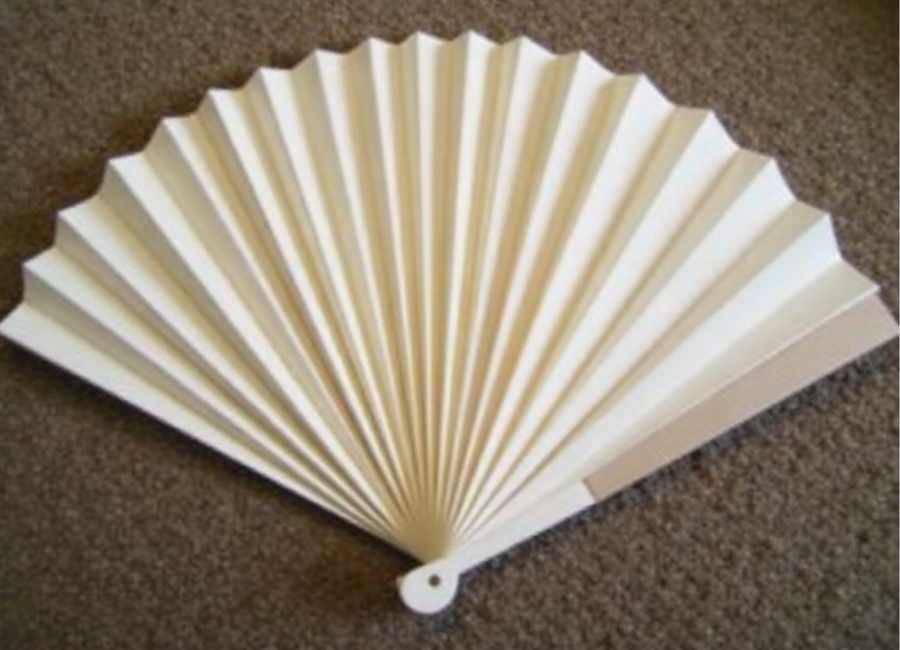
This is the perfect project for a quick, elegant solution to the heat. It requires no special tools, just a piece of paper and a little bit of patience. It’s also a great craft to do with kids.
What You’ll Need
- A rectangular sheet of paper (A4 or letter size works well)
- Optional: Tape, a rubber band, or a string to secure the handle
Step-by-Step Instructions
- Prepare Your Paper: Lay your rectangular sheet of paper on a flat surface. You can use standard printer paper, construction paper, or even decorative scrapbook paper for a more stylish look.
- Make the First Fold: Starting at one of the shorter ends of the paper, fold over a small strip about 1 inch (or 2.5 cm) wide. Press down firmly to create a sharp crease.
- Flip and Fold Again: Flip the paper over. Fold the paper again, using the edge of your first fold as a guide. The goal is to make each fold the same width, creating an accordion-like pattern.
- Continue the Accordion Fold: Keep flipping and folding the paper back and forth until you have folded the entire sheet. You should end up with a compact, multi-layered strip of folded paper.
- Secure the Handle: Fold your accordion-folded strip in half. To create a handle and prevent the fan from unfolding, secure the bottom folded end. You can wrap it tightly with a piece of tape, a rubber band, or tie it with a small piece of string.
- Fan Out and Enjoy: Gently spread out the top portion of the folded paper. Congratulations, you’ve made a classic paper fan! It’s ready to provide a refreshing breeze whenever you need it.
Project 2: A Battery-Powered Handheld Fan
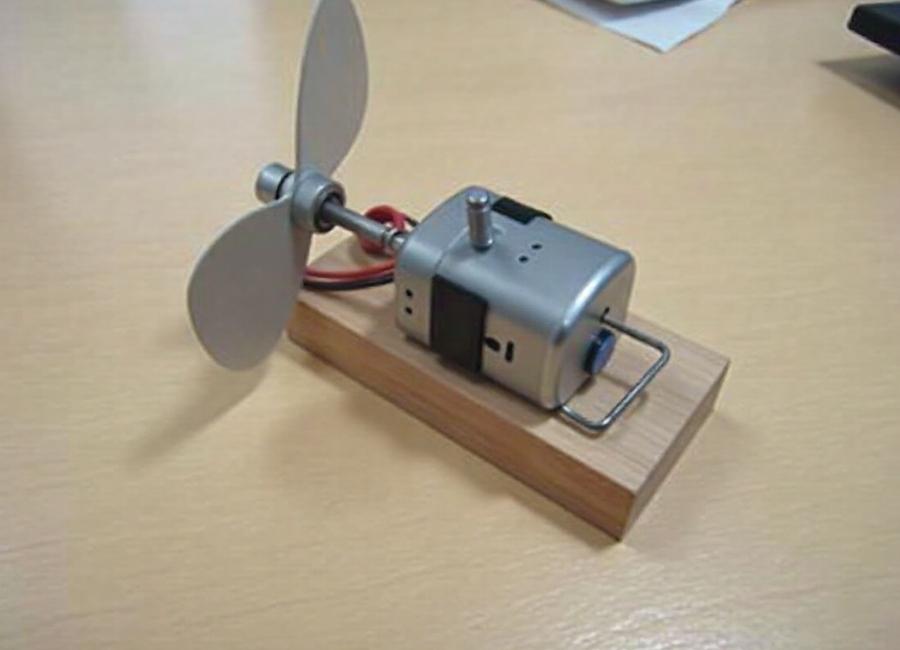
Ready for something a bit more advanced? This project introduces you to a simple circuit. It’s a great first step into the world of electronics and results in a portable fan you can take anywhere.
What You’ll Need
- Small DC motor (1.5-3V)
- A propeller or fan blade (make sure it fits the motor shaft)
- A battery holder for AA or AAA batteries
- Batteries (to match the holder)
- A small switch (optional, but recommended)
- Electrical tape or heat-shrink tubing
- A sturdy base (e.g., a small block of wood, a large cork, or a 3D-printed handle)
Step-by-Step Instructions
- Prepare the Motor and Propeller: Carefully attach the propeller to the shaft of the DC motor. Make sure it’s secure, but don’t force it. The propeller should be able to spin freely without wobbling.
- Mount the Motor: Fix the DC motor to your chosen base using a hot glue gun or strong double-sided tape. Position it so the propeller has plenty of room to spin without hitting anything.
- Connect the Battery Holder: The battery holder will have two wires: one red (positive) and one black (negative). The motor also has two terminals. Connect the black wire from the battery holder directly to one of the motor’s terminals. You can twist the wires together and secure them with electrical tape.
- Wire the Switch (Optional): If you’re using a switch, connect the red wire from the battery holder to one terminal on the switch. Then, take a separate piece of wire and connect it from the other terminal on the switch to the remaining terminal on the motor. This allows you to turn the fan on and off easily. If you are not using a switch, you can connect the red wire from the battery holder directly to the free motor terminal.
- Insert Batteries and Test: Place the batteries into the holder. If you have a switch, flip it on. The motor should spring to life, and the propeller should start spinning. If it doesn’t, double-check all your wire connections to ensure they are secure.
- Secure Everything: Once you’re happy with how it works, use electrical tape or heat-shrink tubing to cover all exposed wire connections. Secure the battery holder and switch to your base with hot glue or tape. Your battery-powered fan is now ready for action!
Project 3: A Modern USB-Powered Desk Fan
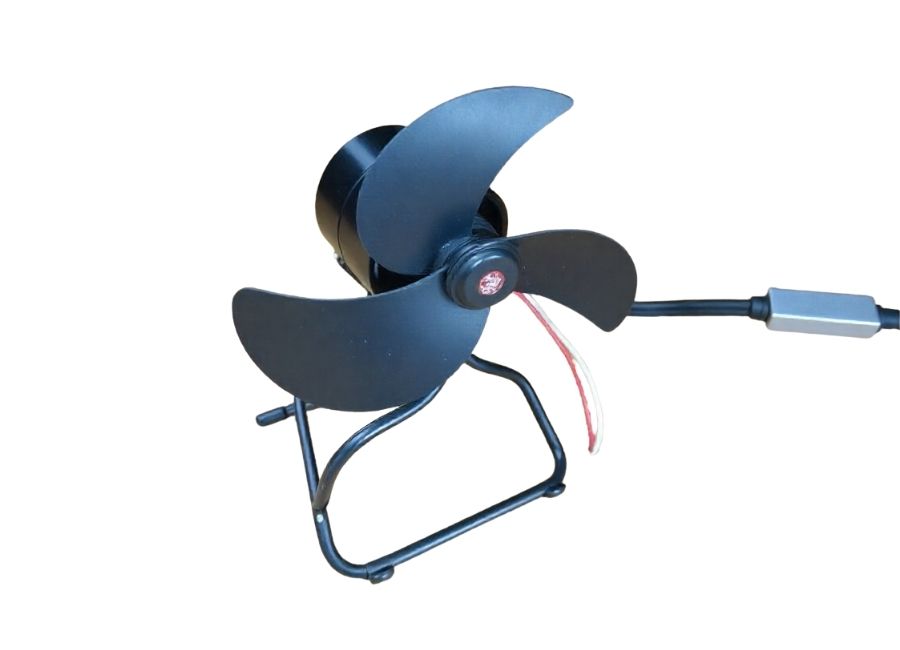
This project is for those who want to create a more permanent and powerful fan for their workspace. It uses a standard USB cable for power, so you can plug it directly into your computer or a USB wall adapter. (How to Make a USB Fan | DIY, n.d.)
What You’ll Need
- 5V DC motor
- A propeller that fits the motor
- An old USB cable
- Wire strippers
- Soldering iron and solder (optional, but creates a more durable connection)
- A stable base or stand (e.g., a 3D-printed enclosure, a small wooden box, or a repurposed object)
Step-by-Step Instructions
- Prepare the USB Cable: Carefully cut off the end of the USB cable that you don’t plug into the computer (e.g., the micro-USB or USB-C end). Use wire strippers to gently remove about 2 inches of the outer plastic sheathing.
- Identify the Power Wires: Inside, you will see four smaller wires. We only need the red (power) and black (ground) wires. The other two (usually green and white) are for data transfer and can be trimmed short and taped off so they don’t cause a short circuit. (USB Pinout Colors Explained: Wiring Guide & Connector Types, n.d.)
- Strip the Power Wires: Carefully strip about half an inch of the plastic insulation from the ends of the red and black wires, exposing the copper strands inside.
- Connect Wires to the Motor: Connect the red wire from the USB cable to the positive terminal of the 5V DC motor. Connect the black wire to the negative terminal. For a secure connection, it’s best to solder these wires in place. If you don’t have a soldering iron, you can twist the wires tightly to the terminals and cover them thoroughly with electrical tape.
- Mount the Fan: Attach the propeller to the motor shaft. Secure the motor onto your base or stand. Make sure it is stable and won’t tip over when the fan is running. A well-designed stand will also help to reduce vibration and noise. (Ultra-Soft Fan Mounts, n.d.)
- Test Your USB Fan: Plug the USB cable into a computer port or a USB wall adapter. The fan should start spinning immediately. If it doesn’t work, unplug it and check your connections. Ensure the red wire is connected to the positive and the black to the negative.
Your Next DIY Adventure
Creating your own fan is more than just a way to stay cool; it’s an opportunity to learn, experiment, and build something useful. Whether you’ve crafted a simple paper fan or engineered a USB-powered gadget, you’ve taken an idea and turned it into a reality.
These projects are just the beginning. You can customize your fans with different colors, materials, and designs. What other everyday problems could you solve with a bit of creativity and DIY spirit?


